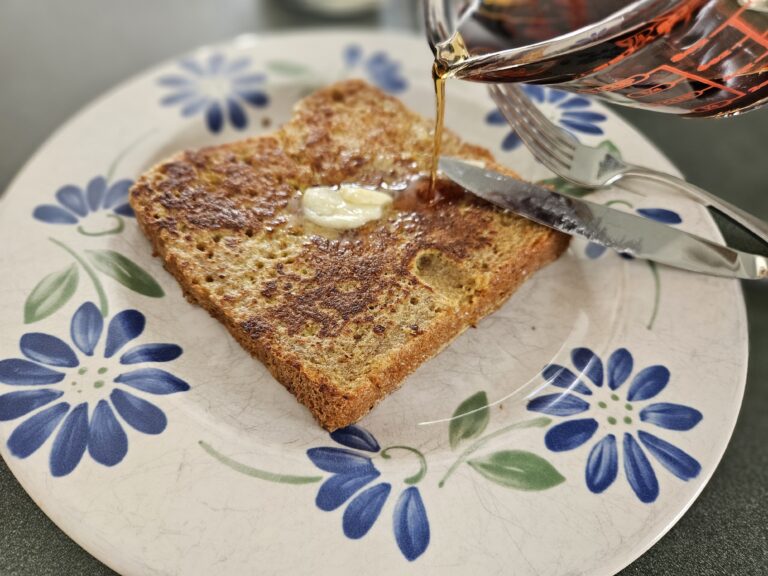
The Best French Toast Recipe!

…simple joy by simpler living

Sweet, soft and fluffy! This french toast recipe is the utmost of deliciousness! Made from freshly milled homemade bread and dripping with real maple syrup, it is a delicious and nutritious way to fuel up for the day!

All my recipes follow three principles: simple, delicious, and nutritious. This recipe is no exception. To make it simple and easy when cooking from scratch, I often separate things into different days. For this recipe, I make the bread one day, then french toast a day or two later when I have time. 

I recently made this with my new Sourdough Bread Machine Recipe and it was better than ever! Be sure to try different breads for different tastes. Freshly milled homemade bread is the most delicious.

This recipe is also a big time-saver because it tastes great as leftovers. I don’t know about you, but my mornings are very busy so having a nutritious prepared breakfast that just needs heating is a huge help! This french toast tastes great the second or third day so I usually make extra just for that purpose.

I love cooking on my cast iron griddle for even cooking and some added iron in our diets. When cooking on medium, it cooks to a nice golden brown.

**This post contains Amazon affiliate links where I make a few cents in commission at no extra cost to you, if you buy the product. I only recommend products I use and really believe in.*

We usually put real maple syrup on it but many other toppings taste great too. Feel free to share your favorite topping!

French Toast

The most delicious French toast from homemade bread.
Prep Time 5 minutes
Cook Time 15 minutes
Total Time 20 minutes
Course Breakfast
Cuisine American
Servings 5
Calories 300 kcal

Ingredients
  

  • 4 eggs
  • 1/4 cup milk
  • 1 tsp vanilla
  • 1/2 tsp cinnamon
  • 5 thick slices bread
  • 4 tbsp butter

Instructions
 

  • Heat skillet to medium heat.
  • Whip 4 eggs in wide flat bowl.
  • Add remaining ingredients and whip thoroughly.
  • Dip freshly cut bread on both sides.
  • Cook on greased skillet until golden brown.
  • Serve with butter & maple syrup.

Advertisements
Advertisements

Sourdough Discard Bread Machine Recipe (with Freshly Milled Flour)

Simple Food

…simple joy by simpler living

The fragrant aroma fresh bread baking is something even the pickiest eaters can’t resist.  This recipe not only has all the deliciousness of freshly baked bread but adds the extra flavor of sourdough to give another level satisfaction to your taste buds!

Freshly milled wheat is one of the best ways to get essential nutrients in your body and what better way to do it than with delicious tasting food!  My regular freshly milled wheat bread recipe was so good that I didn’t think I could be improved upon in taste or health benefits but this recipe is an improvement in both areas. 

I have been trying and trying to find a way to make a sourdough bread in my bread machine.  There are very few recipes out there that don’t involve kneading by hand.  I have neither the time nor ability to do that because of several hand injuries over the years.  After searching high and low for a recipe combining a bread machine, freshly milled wheat AND sourdough – to no avail, I set forth to create one myself. 

I got a good taste on my first try but it took a while to get a loaf of bread that looks good.  First it rose too much and was a gigantic loaf not even able to fit in my bread box.  The next loaf over rose even more then fell creating a big dip in the middle of the loaf.  The following loaf was another fail.  Then just this week – SUCCESS!! 

This loaf has just part sourdough and part freshly milled flour. I will work on more bread recipes with increasing amounts of sourdough. 

This recipe is tweak on my standard freshly milled wheat bread recipe but also includes sourdough starter.  Sourdough not only has a unique flavor adding depth to the bread but also unique health benefits not present even in freshly milled wheat.  It is easier to digest due to the breakdown of starches before you ever eat it, has a lower glycemic index which keeps your blood sugar from rising as much as other bread, and contains probiotics like other fermented foods, which helps your body’s immune system.  The benefit, however, that you will notice first is… it tastes so good!!

The combination of sweet and sour in this bread is a multi-level delight to your taste buds!  When freshly baked, the soft, fluffy texture is literally melt-in-your-mouth delicious!

Delicious enough to eat plain or with a little butter, but most delicious with a little sweetener to complement the sour taste. Honey or fresh fruit preserves give a great result or when my favorite is when turned into french toast. If you thought your homemade bread couldn’t get any better, you have got to try this!

Sourdough Bread in Bread Machine

Recipe combining freshly milled wheat, sourdough, and a bread machine. Easy and delicious!
Prep Time 10 minutes
Cook Time 3 hours
Total Time 3 hours 10 minutes
Course Side Dish, Snack
Cuisine American
Servings 12 people
Calories 90 kcal

Equipment

  • 1 Bread machine
  • 1 Measuring cups set
  • 1 Measuring spoons set

Ingredients
  

  • 1 cup warm water
  • 1/3 cup olive oil
  • 1/3 cup honey
  • 2 tsp salt
  • 1 egg
  • 1/2 cup sourdough starter, active and bubbly
  • 4 cups flour Cool flour first if freshly milled or it may overrise.
  • 3 tsp yeast

Instructions
 

  • Place first 6 ingredients in bread machine pan.
  • Add flour on top of other ingredients.
  • Add yeast by creating a slight well on top of flour so it doesn't touch wet ingredients.
  • Set bread machine to "wheat bread" or with the following custom settings:
    Rest: 25 min.
    Knead: 20 min.
    Rise 1: 45 min.
    Rise 2: 35 min.
    Bake: 1 hour
    Keep warm: off
  • Enjoy!
Keyword bread, freshly milled wheat, sourdough
Advertisements

New 2024 Recipes Coming!!

…simple joy by simpler living

It has been a long time since I wrote a new blog post but rest assured, more are coming soon! I have been busy traveling, dealing with health issues and…cooking with new recipes! All are from scratch, nutritious, and simple! Starting this week, I will be posting new recipes. I have many from the past month that I can’t wait to share with you! 

Healthy cooking the easy way for 2024! 

Let’s journey together with simple, delicious food for maximum health! Below is a sneak peek at some forthcoming recipes…

Advertisements
Advertisements

Party Appetizer: Delicious Homemade Salsa

…simple joy by simpler living

Sweet, salty, and your desired spiciness, this salsa is sure to please all! This recipe is a tweak on my other salsa recipe and makes enough for a crowd. Perfect for any party you are cooking for!

With fresh ingredients, this salsa is a delicious topping to chips. It is also very easy to make with a blender or food processor. You can also feel good serving this at a party because it is healthy in many ways.

There really are just 2 main steps: blackening/removing the tomato skins then mixing all the ingredients in a blender/food processor. The recipe below breaks it down step-by-step.

Healthy Ingredients

Equipment Needed

**This post contains affiliate links, which means I make a small commission at no extra cost to you.**

This recipe doesn’t require any fancy equipment but I have a few favorite products below that simplify and make cooking easier. I’m all for cooking in the simplest, easiest way possible.

  • Ninja Blender – I keep things simple and do not have too many small appliances or gadgets so I like to get multi-purpose ones. I use this as a blender, food processor and smoothie maker. The motor is the best and has never died on me like many other blenders even after MUCH use.
  • Large Cast Iron Skillet – I simplified my kitchen by replacing all non-stick pans with just a few stainless steel and two multi-purpose cast iron pans. This large pan is so useful when making large quantities. Previously I would need to cook twice in a smaller pan but with this fabulous pan, I cut cooking time in half by doing it all at once.
  • Stainless Spatula – Sounds weird that it’s called a fish spatula, but trust me, it is great for cookies, eggs, and anything else on a metal pan. I bought this a few years ago upon a big recommendation that it was way better than other ones. I didn’t fully believe it but needed one so bought it. Now here I am to tell you that this is the BEST spatula to use for cooking on metal pots and pans easily scraping up all food pieces. It is actually the only one I use now so I bought two!
  • Cutting Board – This type have been my favorites for years- non-porous and non-slip.
  • Eversharp Kitchen Knives – I received a set of these knives for my wedding over 20 years ago and they are still sharp! I even run them through the dishwasher after each use – because I keep things quick & easy in my house in order to get more done. This link is for the current version of these fabulous knives.

This salsa is great on its own with chips or as part of a recipe such as tacos or chicken-salsa baked in the oven.

Enjoy!!

Easy Party Salsa Recipe

Fresh ingredients make this large, easy recipe a guilt-free snack! Easy to make. Sure to please.
Prep Time 30 minutes
Total Time 30 minutes
Course Appetizer
Servings 20 Servings

Equipment

  • 1 Blender or Food Processor
  • 1 Large skillet
  • 1 Cutting Board
  • 1 Knife

Ingredients
  

  • 11 Medium-sized Tomatoes Roma work best
  • 1 Clove Garlic
  • 1 Red onion
  • 1 Cup Fresh cilantro
  • 1 Lime
  • 1 tsp Oregano
  • 1 tsp Salt
  • 1 tsp Cumin
  • 2 Tbsp Honey (optional)
  • 1 Jalapeño pepper (optional)

Instructions
 

  • Warm a large skillover medium-high heat.
  • Char skin off tomatoes by turning frequently in hot skillet.
  • Pulse the following in a blender/food processor until chopped:
    Onion, garlic, cilantro.
  • Add: lime juice, oregano, salt, cumin.
  • Taste test and add honey, if desired, to tone down sharpness.
  • Enjoy with chips as a healthy appetizer!
Keyword appetizer, fresh salsa, party appetizer
Advertisements
Advertisements

Easy Hard White Wheat Bread

…simple joy by simpler living

Freshly milled grains make delicious and nutritious bread! This recipe uses only hard white wheat so is my go-to easiest bread!

This bread is so easy, it is my travel bread. It is easy to pack these ingredients to make at homes I visit. And everyone loves it! So much so that I am writing this post for the friends and relatives I just visited who asked for this recipe😀.

Although you can make this by hand, what makes it super easy is a bread machine. Any bread machine will do but I love the Zojirushi bread machine because of the large capacity, custom settings, and extra heating element on top that bakes the bread so evenly. The loaves turn out consistently good.

Why You Will Like this Recipe

Guilt-Free

Freshly ground wheat is the key! It makes a world of difference to grind your own wheat. Freshly ground grains contain a wealth of nutrition not found in such abundance in other foods. This used to be the norm in society until “white bread” became popular. It was at that time in food history that more diseases and inflammation entered societies. Most of the problems people have with gluten are because of the nutritionally stripped wheat used to make almost everything in stores and not with the whole grain of the wheat kernel itself. For more info see “The Truth about Wheat“.

Easy

This bread uses only one grain unlike the mix I use at home that is my favorite fluffy blend. With a little additional yeast, it rises well giving it a not too dense loaf.

Multi-purpose

This loaf can be used for sandwiches, a side to dinners, or simply a snack. While traveling, it served many purposes and fed many!

Delicious

This is so delicious that it was hard to keep a loaf around for a meal unless I put a sign on it to save it. It was hard to resist when the smell of it cooking penetrated the air so pungently. Truly mouth-watering!

Extra Large

This loaf uses 5 cups so it feeds a crowd! Under normal circumstances, this large loaf will last a while. If you are feeding a crowd, it may only last one meal but you will have many happy bellies!

Equipment

**I make a small commission at no extra cost to you if you purchase through the links below**

Here are the grain mill and bread machine I have. They have been very reliable with never one problem with either. They make the best bread!! I travel with them whenever I can and they are durable as well.

 Grain mill  I highly recommend this Nutrimill grain mill. I have had this and used it a lot for almost 10 years never having one single problem with it.

I recommend it over the Wondermill for the simple reason that the Wondermill will break if you turn it off while grinding. It was a MAJOR problem when using a friend’s mill and flour was spewing all over the place so it needed to be turned off. The repair was a huge hassle and big expense. Seems to be basic Electronics 101 that you should be able to turn it off if needed without breaking the machine.

The Nutrimill grinds fine or coarse, making great bread or cookies. Therefore, my high recommendation is the Nutrimill.

Bread machine  This machine makes the best bread!! The custom settings and extra heating element in the top really makes this machine the best one that I know of.

Bread Box  This is the bread box I have used for years with great success keeping the bread fresher than it does in other packaging.

Ingredients

Fresh, high quality ingredients are key! I try to buy as much local as I can and it really makes a difference.

Flour – I suggest buying through Azure Standard. They have a large variety of high quality, organic products. This recipe uses hard white wheat berries.

Honey – Since honey is one of the most counterfeited foods sold in grocery stores, I only buy local honey. The taste is so delicious, that we often take a spoonful instead of a less healthy treat to satisfy sweet cravings. I buy in bulk to get the best deal from a local honey farm. It adds delicious flavor in this recipe and especially when drizzled on a steaming hot piece of fresh bread!

Salt – I used “Real Salt” from Azure Standard. It can also be bought on Amazon. It is unrefined and natural and good for all cooking and baking. Again, I buy in bulk to get the best price so I can afford this high quality salt.

Olive Oil – High quality olive oil can be bought from Azure Standard or other local sources.

RECIPE:

Hard White Wheat Bread

Freshly milled hard white wheat makes a delicious loaf of bread for sandwiches oras a side to dinner
Prep Time 15 minutes
Cook Time 3 hours
Total Time 3 hours 15 minutes
Course Side Dish, Snack
Cuisine American
Servings 15
Calories 110 kcal

Ingredients
  

  • 1 1/2 cups warm water
  • 1/3 cup olive oil
  • 1/3 cup honey
  • 2 tsp salt
  • 1 egg
  • 5 cups freshly milled hard white wheat
  • 1 1/2 tbsp instant yeast

Instructions
 

  • Add ingredients in order listed to bread machine, adding yeast at end to top, keeping away from wet ingredients.
  • Set bread machine to "wheat bread" or the following custom settings:
    Rest: 25 minutes
    Knead: 20 minutes
    Rise 1: 45 minutes
    Rise 2: 35 minutes
    Bake: 1 hour
    Keep Warm: Off
Keyword bread, freshly milled, hard white wheat, high protein, low gluten

How To Eat

This bread is great for sandwiches or as a side for dinners: plain, with butter, or honey.

Advertisements
Advertisements
Advertisements

Black Friday Deals for a Simplified Home

Below I have listed all the recommended items from my blog pages to make it easier to quickly check prices. I personally use most of the items listed below that have made it easy for me to have a simple, healthy home. Browse below and leave a comment if you have any questions about the products.

**I make a small amount for purchases made from the links below at no additional cost to you**

Kitchen Aid Stand Mixer – I love using a stand mixer because it allows me to multi-task and makes mixing incredibly easy. Kitchen Aid motors are the most durable. I’ve had this plus a hand mixer that has lasted over 20 years with a lot of heavy use.

Grain Mill – There are many grain mills to choose from. I researched and landed upon a Nutrimill because of it’s ease of use better quality and ability to start and stop it mid-grind, if needed. After owning one and using it many times weekly for over 7 years, I can attest for it’s durability too! A great investment! It is the gateway to massively increasing nutrition in foods you cook. Read my post on the Truth about Wheat to understand the immense nutritional value of grinding your own wheat. I own an older version which is not available but I recommend this one for it’s improved features and stone mill grinding.

Zojirushi Bread Machine – This is by far the best bread machine. Not only do you have many pre-programmed bread settings but you also have the invaluable custom setting. The bread pan has a nice shape and creates a beautiful loaf of perfectly cooked bread in part to the rare extra heating element on the top. Making homemade bread has never been easier or more successful!

Other Bread Machines – You can see from this link that many are on sale.

Ninja Blender We use this almost everyday for smoothies. Easy to make the whole family’s smoothies in one batch. Grinds up frozen fruit perfectly smooth when mixed with juice and yogurt.

24 Muffin Tin – I recently discovered a real time-saver:  a 24 muffin tin.  This saves so much time because you only have to cook half as much as a 12 muffin tin.  I realized that I stayed away from making muffins because of the time and work of having to repeat the cooking process 2-4 times, depending on how much you are making.  This has been hugely valuable in my kitchen because I always have several things I am making at once and it makes muffin making a super quick process.

Pot Holders – These are my favorites.  I got them because my husband wanted bigger ones that fit his hands and my arm got burnt from shorter ones.  These are now the favorites for the whole family. Looks nice and protects your arms too!

Muffin liners– Natural muffin liners.

Spatula – Set of nice spatulas in a variety of sizes.

Measuring spoons – These keep your drawer neat, yet let you take one individual spoon out easily. It is also so helpful to have two sides for multiple ingredients.

Measuring cups – Nice, durable and pretty!

Stir Crazy Popcorn Maker – We are big popcorn eaters in our house and this took our popcorn to a whole new level. We just got this a year ago & it is our new favorite way to pop popcorn. It makes the most delicious roasted flavor. You can use your own popcorn and butter to make it the healthy by using quality ingredients.

For Yogurt Making:

  • Instant Pot – This is the one with a yogurt function too. A multi-use appliance.
  • Whisk – This is my most useful whisk. The rubber handle makes it quick & easy to use!
  • Food Thermometer – After many thermometers breaking very easily, I found this durable one that has lasted a long time and is waterproof.
  • Greek Yogurt Strainer – I have had several strainers and find these round ones are the easiest to use. I use 2 for each gallon of milk. They are easy to remove the strained yogurt and dishwasher safe.
  • Instant Pot Glass Lid Because it is not pressure cooked you can get a glass lid for yogurt making.  I did this because I make so much and it is easier to wash & see inside. It also can be used for storing in the refrigerator.
  • Instant Pot Plastic Lid – I also have this lid because it seals well and allows me to store yogurt in the refrigerator while making my next batch of yogurt.

Advertisements
Advertisements
Advertisements
Advertisements

Happy Thanksgiving!

…simple joy by simpler living

Thanking God for the many blessings He has given this year! Family, friends, salvation, amazing chuch family, and the sweetest son who just turned 18!! Life always has difficulties, but having a friend in Jesus who is there to walk alongside me and promises a future with Him in heaven is better than anything else.

‭‭John‬ ‭14:6‬ ‭NASB1995‬‬
Jesus said to him, “I am the way, and the truth, and the life; no one comes to the Father but through Me.

https://bible.com/bible/100/jhn.14.6.NASB1995

Praying God’s blessings on everyone who reads this! May you know His peace which surpasses all understanding!

Chocolate Chip Cookies with Freshly Milled Flour

…simple joy by simpler living

Melt in your mouth delicious! These chocolate chip cookies are a guilt-free treat. Made with freshly milled grains; they not only satisfy sweet cravings but also your body’s nutrient cravings. With all the nutrients in freshly milled whole grains, these cookies can even count as a necessary part of your diet!

Why You Will Love Them

Easy – The recipe below is easy to follow and mix together. I keep all these ingredients on hand so theycan be whipped up in less than 10 minutes. It is also easy to double this recipe and bake for a crowd.

Delicious – These cookies are especially delicious! The natural sugar and freshly milled wheat give it richer flavor. The milk chocolate really sets it apart from other chocolate chip cookies. Because of the sweetness of the milk chocolate, this recipe calls for less sugar than other recipes.

NutritiousFreshly milled grains contain many vitamins, minerals, and other nutrients like fiber. These cookies are no exception! Delicious and nutritious! That’s a good combo! By using unprocessed ingredients like sucanat sugar, you not only get more flavor but it satisfies like only real nutrition can.

Equipment Needed

Not much is needed for basic cookies but I have a few things that make easier. I only cook if it is easy and also don’t like a lot of gadgets so the equipment I use here is reused in many recipes in my kitchen to keep it simple, quick and easy.

**I make a small commission at no cost to you for purchases made through the following links. I ONLY recommend items I actually use and believe in.**

Electric Mixer – For years I exclusively used a hand held mixer but now, since multitasking even more, I mostly use my stand mixer. Both are Kitchen Aid brand since I learned they have the best motors. In over 20 years of heavy use, neither motor has broken (unlike the many, many hand mixers that constantly broke in my home growing up)!

Rubber Spatula Scraper – A must for getting the last bits of dough out of the bowl.

Cookie Sheet – I switched to air insulated cookie sheets years ago and will never go back. These pans prevent the bottoms of the cookies from burning and lead to more evenly cooked cookies. They are far superior any other cookie sheet, even the heavy duty type.

Cookie Dough Scooper – This scooper is an extra, as a spoon and your finger or another spoon will do but it makes it easy, has less clean up, and makes evenly sized and shaped cookies. It is one of my secrets to being able to quickly whip up a batch of homemade cookies.

Spatula – I bought these “fish spatulas” a few years ago and they ended up being so good that I never use my old ones. They are a thin but sturdy metal that easily lifts food cleanly off the pan. These are some of my most useful kitchen tools.

Wire Cooling Racks – A must for cookies! These cool cookies evenly and are easy to store afterwards.

Ingredients

Flour – I used only freshly milled flour so it retains all of its nutritional benefits and is lower gluten. Sometimes I grind the flour a few days ahead and store in my freezer. It oxides more slowly and still maintains most nutrients and is SUPER easy this way.

Baking Soda

Salt – I use “Real Salt” which is an unrefined ancient sea salt.

Butter/Margarine – I use “yogurt butter” which is the layer of fat on the top of my homemade yogurt. It does really well in baked goods!

Natural Sugar – I only use unprocessed sugars and try to lessen them as much as possible yet still taste delish. My sugar if choice for cookies is sucanat. It has a rich taste similar to brown sugar but better for you.

Pure Vanilla Extract

Eggs

Milk chocolate chips or cut up chunksThese makes the cookies taste SO much better than the typical semi-sweet chips.

Freshly Milled Chocolate Chip Cookie Recipe

Delicious and nutritious homemade Chocolate Chip Cookies
Prep Time 15 minutes
Cook Time 12 minutes
Total Time 27 minutes
Course Dessert
Cuisine American
Servings 24 cookies
Calories 110 kcal

Equipment

  • 1 Electric mixer
  • 1 Rubber spatula scraper
  • 1 Cookie sheet (with air pocket)
  • 1 Cookie dough scooper
  • 1 Spatula
  • 1 Wire cooling rack

Ingredients
  

  • 2 1/2 cups flour (soft white, spelt or combo) (300 grams)
  • 1 tsp baking soda
  • 1 tsp salt
  • 1 cup butter (227 grams)
  • 1 1/2 cup sugar (sucanat, cane sugar, …) (210 grams)
  • 2 tsp pure vanilla extract
  • 2 eggs
  • 1 cup milk chocolate chips or cut up chunks (170 grams)

Instructions
 

  • Preheat oven to 350 degrees.
  • Combine dry ingredients in a separate bowl: flour, baking soda and salt.
  • In stand mixer (or main mixing bowl) combine at medium speed: butter, sugar, and vanilla until creamy and fluffy.
  • Continue mixing on medium while adding eggs.
  • Turn mixer to low speed and add dry ingredients. Turn back to medium after initially blended to fully mix together.
  • Turn mixer to low and add chocolate chips.
  • Scoop cookie dough into 1 inch balls onto ungreased cookie sheet.
  • Bake for 12 minutes.
  • Cool on baking racks.
Keyword cookies, snack

Jesus is the Door

…simple joy by simpler living

Continuing the responses for the online Bible Study. All women are welcome to join at WomenLivingWell.org

Today’s passage is about Jesus being The Door.

‭John‬ ‭10:7‭-‬9‬ ‭ESV‬
So Jesus again said to them, “Truly, truly, I say to you, I am the door of the sheep. All who came before me are thieves and robbers, but the sheep did not listen to them. I am the door. If anyone enters by me, he will be saved and will go in and out and find pasture.

https://bible.com/bible/59/jhn.10.8.ESV

I looked up a few of the original Greek words in Strong’s concordance and Vine’s Bible Dictionary to try to understand this verse more deeply. 

Door – G2374 thura

This is the same Greek word used in Rev. 3:20 of Christ’s “entrance” into a repentant believers heart.

Jesus is the door/portal/gate of the sheep/His children. 

Saved – G4982  sōzō

delivered, protected (literally or figuratively), heal, preserve, do well, make whole, inclusively for all the blessings bestowed by God on men in Christ

If anyone enters through Jesus, he will be saved/delivered/made whole...

Pasture – G5342 nomē (noun)

food (pasturage), (figuratively in John 10:9)

Dictionary.com– an area covered with grass or other plants used or suitable for the grazing of livestock 

…and will go in and out and find pasture/provision.

The Bread of Life

…simple joy by simpler living

‭‭John‬ ‭6:35‬ ‭ESV‬‬
Jesus said to them, “I am the bread of life; whoever comes to me shall not hunger, and whoever believes in me shall never thirst. https://bible.com/bible/59/jhn.6.35.ESV

I am doing a Bible Study studying many of the names of Jesus. When I saw this verse, I had much more of an understanding of this verse than I had years ago prior to learning about real bread made from the whole wheat grain.

To really understand this verse, we need to know what the bread was that Jesus is talking about. Bread was made from start to finish in homes from the whole grain to the finished bread. It is nothing like the bread now available in stores today which is devoid of almost anything good.

The Amazing Benefits of the Whole Wheat Grain

The wheat grain, in its whole form, is one of the most nutritionally dense foods. Once ground into flour, the nutrients begin to deteriorate and oxidize so it needs to be made into bread immediately to maintain its nutrition and keep from turning rancid.

To prevent flour currently sold in grocery stores from becoming rancid, part of the grain is removed– the part with the most nutrients. What is left is the least nutritional part. Basically all of the gluten and none of the nutrition.

Today, the flour and bread we have in our grocery stores, even “whole wheat “, is not nearly what was found in Ancient times. It’s really not even healthy.

So when the Bible talks about bread, it is talking about it using its entire whole grain, being nutrionally dense and providing a plethora of nutrients for healing and sustaining health. It was an essential part of a balanced meal necessary for our bodies’ daily functioning up until a century ago.

This bread is still able to be made today, you just need to buy whole wheat berries and a grain mill to grind it yourself. With the modern appliances that are available, this task is very easily done. I can grind wheat and pop in my bread machine in less than 10 minutes. Three hours later, I have steaming, moist, delicious bread that literally melts in my mouth. Delicious and so nutritious! Because I make and eat this freshly milled bread on a regular basis, I can attest to the difference it makes from other bread.

Nutritious, Filling, Satisfying

It satisfies hunger like I have never experienced before. Prior to grinding my own wheat, I was the queen of snacks. My pantry was filled with chips, cookies and other snacks because I was always hungry. After I started grinding my own wheat and making bread with this super food, I was no longer hungry AT ALL between breakfast and lunch. In fact, I stopped eating lunch at noon because I didn’t get hungry until 2 ish.

When I filled upon the best food, my body had more energy, healed up and didn’t hunger for less beneficial things.

So real bread that is referred to in the Bible is:

  • immensely nutritious
  • immensely filling
  • immensely satisfying

Jesus is the Bread of Life

In John 6: 35, Jesus says He is the Bread of Life. Just like real bread made from the whole grain, Jesus is the:

  • ultimate spiritual nutrition
  • ultimate filling of our souls
  • ultimate satisfaction

When He fills our hearts, we no longer yearn for cheaper, lesser things to fill us because other things pale in comparison to His glory and His love. Anything else that we fill ourselves with will only leave us hungry. Whoever comes to Him, shall not hunger, and whoever believes in Him shall never thirst. Jesus is The Bread of Life!

Advertisements